Fields of Fire Vassal Session Report
Posted: Mon Nov 29, 2021 8:18 pm
Hi all,
I thought I'd post about my session with Fields of Fire the solitaire WW2 boardgame, and
my experience using the VASSAL module: Fields of Fire - All Volumes and Expansions, 2.4.10
For this first playthrough I'm using the first mission in the original Fields of Fire boardgame. So join me as we follow Abel company, 9th Infantry Division, on their first mission in WW2.
June 8, 1944, Trevieres Offensive.
Abel Company was ordered to take and hold marshy ground and some hedgerows on the outskirts of the village of Trevieres, headquarters of Grenadier-Regiment 316 of the 352nd German infantry division, as part of the battalion wide effort to take the town.
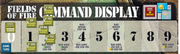
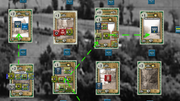
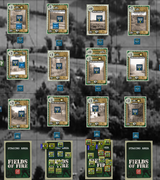
Setup in VASSAL is pretty easy. Just click on the Normandy button and it brings up the Normandy terrain deck. Bonus feature, it has all the unit counters I need for the first mission. Clicking and dragging the card to the map flips it face up, and I was able to build the battlefield very quickly with my control markers.
Captain Rand, of Abel comapny, decided his 1st and 2nd platoons would be the assault and support elements, with 3rd platoon in reserve. As such, he gave his 1st and 2nd platoon leaders a .30 light machine gun team in addition to the mortar section, bazooka team, and rife grenades that all platoons received.
Another bonus, changing the unit border colors to more easily show attachments. For this game each Platoon HQ will have a different border color. Attached weapon teams (MGs, bazookas, mortars) will have the same color as the Platoon HQ to which they are attached. I don't need to change the borders of the squads, because their unit designations make them obvious which platoon they belong to. The module also lets me add custom text to the left border of a unit. I use this to highlight which squads carry the rifle grenades.
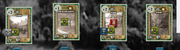
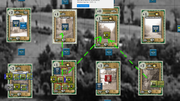
Here is a closer look at my setup in the center of the staging area. For reference, I am naming the columns from left to right using the WW2 phonetic alphabet. Abel, Baker, Cook, Dog from left to right. Then from bottom to top, row 1, row2, row3.

1PHQ (1st Platoon Headquarters) is outlined in blue. I attached 1/AT team (bazookas) 1/Mrtr (mortar team) and 1/LMG (light machine guns) to it. I forgot to highlight 1/LMG with the blue border, but fixed it later. Notice that I also gave the rifle grenades to 3/1PLT (3rd squad, 1st platoon) and it has 2 charges.
Company Headquarters (COHQ) is also in Staging Area Baker, along with the Arty FO (forward observer) and two runners. The runners are used to send orders to platoons and other company staff that may be out of radio range.
"Sloan, Lennie, Johnson, grab a radio.", said the Captain to his platoon leaders. "The XO, First Sargeant, and I will also be on the Company net. Try not to wander off, these radios have line-of-sight range only."
Speaking of radio range, right-clicking on a unit and selecting "Add Comms" puts a little radio icon on the unit counter. You can see it on the COHQ and 1PHQ above the green "G". I gave radios to each platoon leader and company staff. That's 6 radios. According to the rulebook the Arty FO has his own radio and can talk on the Company Net if needed, so I don't need to give him one.
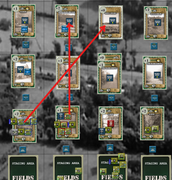
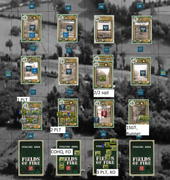
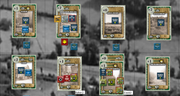
Staging Area Cook has a lot of units. Note that Staging Areas have unlimited capacity, unlike the terrain above the staging areas, where each card can only hold a maximum of 16 steps. This gives me a little trouble later in the game when I figure out how to move up my reserve platoon.
2PHQ (Second Platoon Headquarters) is highlighted in red. It also has an LMG, bazooka team, and mortar team attached. 3/2 squad (3rd squad, 2nd platoon) has the rifle grenades. 1P and 2P are my fire and maneuver platoons so they have an LMG each. 3P is my reserve platoon, so they only have the third bazooka and mortar team (highlighted in yellow), and rifle grenades assigned to 3/3 (3rd squad, 3rd platoon).
The 1/50 cal HMG (heavy machine gun) and Arty FO are not attached to any platoon. I don't want them moving out when I give a platoon move order, so they will have to be explicitly ordered by Company staff (COHQ, XO, or Co 1SGT (Company First Sargeant). This way I don't have to worry about them being on the front line. I want them behind the front, able to see and support the front line.
I should also point out the numbers in the blue boxes for the bazookas, mortars, and machine gun teams. That's the ammo counter. Right click on the unit and click "use ammo" to decrease the ammo left every time the unit fires. Much easier than having to consult the mission log.
That's it for now. My next post will talk about turn1, and some rules and gameplay lessons I learned along the way.
I thought I'd post about my session with Fields of Fire the solitaire WW2 boardgame, and
my experience using the VASSAL module: Fields of Fire - All Volumes and Expansions, 2.4.10
For this first playthrough I'm using the first mission in the original Fields of Fire boardgame. So join me as we follow Abel company, 9th Infantry Division, on their first mission in WW2.
June 8, 1944, Trevieres Offensive.
Abel Company was ordered to take and hold marshy ground and some hedgerows on the outskirts of the village of Trevieres, headquarters of Grenadier-Regiment 316 of the 352nd German infantry division, as part of the battalion wide effort to take the town.
Setup in VASSAL is pretty easy. Just click on the Normandy button and it brings up the Normandy terrain deck. Bonus feature, it has all the unit counters I need for the first mission. Clicking and dragging the card to the map flips it face up, and I was able to build the battlefield very quickly with my control markers.
Captain Rand, of Abel comapny, decided his 1st and 2nd platoons would be the assault and support elements, with 3rd platoon in reserve. As such, he gave his 1st and 2nd platoon leaders a .30 light machine gun team in addition to the mortar section, bazooka team, and rife grenades that all platoons received.
Another bonus, changing the unit border colors to more easily show attachments. For this game each Platoon HQ will have a different border color. Attached weapon teams (MGs, bazookas, mortars) will have the same color as the Platoon HQ to which they are attached. I don't need to change the borders of the squads, because their unit designations make them obvious which platoon they belong to. The module also lets me add custom text to the left border of a unit. I use this to highlight which squads carry the rifle grenades.
Here is a closer look at my setup in the center of the staging area. For reference, I am naming the columns from left to right using the WW2 phonetic alphabet. Abel, Baker, Cook, Dog from left to right. Then from bottom to top, row 1, row2, row3.
1PHQ (1st Platoon Headquarters) is outlined in blue. I attached 1/AT team (bazookas) 1/Mrtr (mortar team) and 1/LMG (light machine guns) to it. I forgot to highlight 1/LMG with the blue border, but fixed it later. Notice that I also gave the rifle grenades to 3/1PLT (3rd squad, 1st platoon) and it has 2 charges.
Company Headquarters (COHQ) is also in Staging Area Baker, along with the Arty FO (forward observer) and two runners. The runners are used to send orders to platoons and other company staff that may be out of radio range.
"Sloan, Lennie, Johnson, grab a radio.", said the Captain to his platoon leaders. "The XO, First Sargeant, and I will also be on the Company net. Try not to wander off, these radios have line-of-sight range only."
Speaking of radio range, right-clicking on a unit and selecting "Add Comms" puts a little radio icon on the unit counter. You can see it on the COHQ and 1PHQ above the green "G". I gave radios to each platoon leader and company staff. That's 6 radios. According to the rulebook the Arty FO has his own radio and can talk on the Company Net if needed, so I don't need to give him one.
Staging Area Cook has a lot of units. Note that Staging Areas have unlimited capacity, unlike the terrain above the staging areas, where each card can only hold a maximum of 16 steps. This gives me a little trouble later in the game when I figure out how to move up my reserve platoon.
2PHQ (Second Platoon Headquarters) is highlighted in red. It also has an LMG, bazooka team, and mortar team attached. 3/2 squad (3rd squad, 2nd platoon) has the rifle grenades. 1P and 2P are my fire and maneuver platoons so they have an LMG each. 3P is my reserve platoon, so they only have the third bazooka and mortar team (highlighted in yellow), and rifle grenades assigned to 3/3 (3rd squad, 3rd platoon).
The 1/50 cal HMG (heavy machine gun) and Arty FO are not attached to any platoon. I don't want them moving out when I give a platoon move order, so they will have to be explicitly ordered by Company staff (COHQ, XO, or Co 1SGT (Company First Sargeant). This way I don't have to worry about them being on the front line. I want them behind the front, able to see and support the front line.
I should also point out the numbers in the blue boxes for the bazookas, mortars, and machine gun teams. That's the ammo counter. Right click on the unit and click "use ammo" to decrease the ammo left every time the unit fires. Much easier than having to consult the mission log.
That's it for now. My next post will talk about turn1, and some rules and gameplay lessons I learned along the way.