Page 27 of 69
Re: [Miniatures] Painting tips and progress reports (with pics!)
Posted: Mon Apr 29, 2019 2:59 pm
by Isgrimnur
Heats over to the reddit model makers subreddit. Plenty of folks doing vehicles and military equipment that have experience with chipping.
Re: [Miniatures] Painting tips and progress reports (with pics!)
Posted: Mon Apr 29, 2019 3:11 pm
by Blackhawk
A quick trip to the dollar store, thrift shop, or your own scrap bin often turns up piles of stuff to experiment with new techniques on. For instance, since I re-base all of my Bones, I save the old bases just to try new materials and tricks on.
Re: [Miniatures] Painting tips and progress reports (with pics!)
Posted: Mon Apr 29, 2019 8:08 pm
by Smoove_B
Blackhawk wrote: ↑Mon Apr 29, 2019 3:11 pm For instance, since I re-base all of my Bones, I save the old bases just to try new materials and tricks on.
As someone that is just now getting into Bones, when you say "re-base' do you mean you're physically removing them from the round/oval bases they are all seemingly cast with and then affixing them to a round black base? If so, how are you removing them? I've considered it but could only brute-force my brain around separating them and it looked (in my mind's eye) ugly and difficult.
Re: [Miniatures] Painting tips and progress reports (with pics!)
Posted: Mon Apr 29, 2019 8:20 pm
by Blackhawk
Smoove_B wrote: ↑Mon Apr 29, 2019 8:08 pm
Blackhawk wrote: ↑Mon Apr 29, 2019 3:11 pm For instance, since I re-base all of my Bones, I save the old bases just to try new materials and tricks on.
As someone that is just now getting into Bones, when you say "re-base' do you mean you're physically removing them from the round/oval bases they are all seemingly cast with and then affixing them to a round black base? If so, how are you removing them? I've considered it but could only brute-force my brain around separating them and it looked (in my mind's eye) ugly and difficult.
Basically. Although I never used plain round black bases. I used to go with fully decorated bases. Now I've switched to simple acrylic.
Bones PVC is extremely soft and easy to cut. I just use an XActo knife and carefully push (rather than slicing) the blade under the edge of the foot just a bit, then do it form the other directions until the foot comes loose. As an alternative that's a little faster and easier (but doesn't preserve the base), I've been using an edge cutter designed specifically for plastics (marketed as a sprue cutter.) I cut along each long edge of the foot, in front, and behind. Foot's free, but has a lump on the bottom. I then place it even with the bottom of the foot and snip.
I covered the first method clear back on
page one.
Re: [Miniatures] Painting tips and progress reports (with pics!)
Posted: Mon Apr 29, 2019 9:34 pm
by Smoove_B
Wow. Just realized this thread is almost 7 years old! Thanks.

Re: [Miniatures] Painting tips and progress reports (with pics!)
Posted: Mon Apr 29, 2019 10:56 pm
by Punisher
wonderpug wrote: ↑Mon Apr 29, 2019 9:03 am
Anyone have a link to a walkthrough on
really quick & easy stormtrooper painting? (Imperial Assault) The best I can find so far are still like 15 minutes per figure, which for me would be closer to 20 or more. I really don't need mine to be museum pieces at all; I'm just aiming for "good enough to look like stormtroopers".
I've started trying a few things. Currently I'm trying prime white, black or grey sharpies for the black parts, then a light colored wash to rounf it out. I also have skipped the wash. I'll try to get some pics up for you.
Re: [Miniatures] Painting tips and progress reports (with pics!)
Posted: Mon Apr 29, 2019 11:19 pm
by hentzau
Re: [Miniatures] Painting tips and progress reports (with pics!)
Posted: Mon Apr 29, 2019 11:42 pm
by Punisher
This is a simplish technique, but it took her 20 minutes for 1 and 15 minutes each in a batch, so it is longer than he is looking for. FWIW, this video is on my list of techniques o try for my Stormtroopers.
Re: [Miniatures] Painting tips and progress reports (with pics!)
Posted: Mon Apr 29, 2019 11:47 pm
by Smoove_B
That's pretty interesting - sort of painting it in reverse. I think I'd do it the way the first person commenting suggested:
Another easy way: Prime white, clear-coat, apply GW Nuln-oil gloss into the recesses (don't have much on your brush), let dry, dull-coat (or leave clear coated)
This is basically what I've done with skeletons - prime them in bone white, then hit them with a sepia wash. I then detail anything they're holding or wearing (weapons, armor, boots, etc...) assembly-line style. They don't look as great as her method, but they probably take about 5 or 8 minutes each this way instead of 20.
Re: [Miniatures] Painting tips and progress reports (with pics!)
Posted: Tue Apr 30, 2019 12:08 am
by hentzau
Oh. Missed that he was looking for faster than 15 minutes.
Well, prime white, quick dark grey or black on joints and guns and eyes, and then a dip in Army Painter strong tone or dark tone. That’s probably the fastest you could get it done.
Re: [Miniatures] Painting tips and progress reports (with pics!)
Posted: Tue Apr 30, 2019 12:32 am
by hentzau
Oh, and a thorough washing of the PVC figures. I’d recommend simple green and water. I give them a solid soak for at least a few hours then a scrub and rinse.
Re: [Miniatures] Painting tips and progress reports (with pics!)
Posted: Tue Apr 30, 2019 12:43 am
by Blackhawk
hentzau wrote: ↑Tue Apr 30, 2019 12:08 am
Oh. Missed that he was looking for faster than 15 minutes.
Well, prime white, quick dark grey or black on joints and guns and eyes, and then a dip in Army Painter strong tone or dark tone. That’s probably the fastest you could get it done.
Strong is very brown. Dark is more of a gray/black. But yeah, this is about as fast as you'll get. If you wanted to take it a single step further for much better results, hit the center of the large areas with a little thinned-down white after the quickshade dries.
Re: [Miniatures] Painting tips and progress reports (with pics!)
Posted: Tue Apr 30, 2019 1:14 am
by Zarathud
When we had a single nice day, I was able to finally clear coat my figures for Stuffed Fables, the Red Dragon, and the Beholder.

The Beholder came out a dark, rich purple from the purple ink I used over lighter purples (Imperial/Icy Violet). I'm torn over going back for drybrushing, as I like how it looks on the tabletop even knowing the contrast could be improved. I do like the effect on the lighter eyestalks, which is entirely from the purple ink over the white model. My other disappointment is that the matte clearcoat ended up clouding the plastic over the main eye. I should have waited until the end to glue on the plastic. A lesson for next time.
I'll be picking up some primer for the monsters in the Mice & Mystics game, which will be my next project. I might end up painting the Bones mice adventurers, depending on when my order finally arrives and how long it takes to get a nice day to base coat. So much plastic to paint.
Re: [Miniatures] Painting tips and progress reports (with pics!)
Posted: Tue Apr 30, 2019 2:18 am
by Blackhawk
Boardgaming miniatures have been a learning experience for me. I'm so used to painting a handful of figures in careful detail that I've had trouble wrapping my head around getting 40 figures painted 'good enough' with compromises in order to not have them take five months. I've finished two boardgames: Fallout, which only had five miniatures, and Mice & Mystics, which was the first game to really force me to compromise to get it finished. Now I'm working on Sword & Sorcery, which has tons of pieces.
[Miniatures] Painting tips and progress reports (with pics!)
Posted: Tue Apr 30, 2019 2:25 am
by Zarathud
It's easier if your minis get mixed with prepainted figures and your skills are limited.

I know my beholder and red dragon could be better. But they're already better than the prepainted lines, so I'm happy.
Re: [Miniatures] Painting tips and progress reports (with pics!)
Posted: Tue Apr 30, 2019 8:36 am
by hepcat
Blackhawk wrote: ↑Tue Apr 30, 2019 2:18 am
Now I'm working on Sword & Sorcery, which has tons of pieces.
Are you going to leave the bases their original color for the enemy figs in order to distinguish between the different levels?
Re: [Miniatures] Painting tips and progress reports (with pics!)
Posted: Tue Apr 30, 2019 8:57 am
by wonderpug
hentzau wrote: ↑Tue Apr 30, 2019 12:32 am
Oh, and a thorough washing of the PVC figures. I’d recommend simple green and water. I give them a solid soak for at least a few hours then a scrub and rinse.
Is cleaning essential for all miniatures? I had thought so before, but a local mini painter friend made me think it was only necessary for certain types.
Re: [Miniatures] Painting tips and progress reports (with pics!)
Posted: Tue Apr 30, 2019 9:05 am
by AWS260
Well, it depends on where you've been putting them.
Re: [Miniatures] Painting tips and progress reports (with pics!)
Posted: Tue Apr 30, 2019 10:06 am
by hentzau
wonderpug wrote:hentzau wrote: ↑Tue Apr 30, 2019 12:32 am
Oh, and a thorough washing of the PVC figures. I’d recommend simple green and water. I give them a solid soak for at least a few hours then a scrub and rinse.
Is cleaning essential for all miniatures? I had thought so before, but a local mini painter friend made me think it was only necessary for certain types.
I wash EVERYTHING. Especially softer plastics like PVC and resins. They all have release agents on them that don’t mix well with paints. First time I had a figure finished and a day later I was able to just pick the paint off of it, that sold me.
Re: [Miniatures] Painting tips and progress reports (with pics!)
Posted: Tue Apr 30, 2019 10:17 am
by Blackhawk
wonderpug wrote: ↑Tue Apr 30, 2019 8:57 am
hentzau wrote: ↑Tue Apr 30, 2019 12:32 am
Oh, and a thorough washing of the PVC figures. I’d recommend simple green and water. I give them a solid soak for at least a few hours then a scrub and rinse.
Is cleaning essential for all miniatures? I had thought so before, but a local mini painter friend made me think it was only necessary for certain types.
Yes, except for pre-primed (which I strip, wash, and re-prime anyway.) First (and mainly) the molds are treated with a release compound to keep the miniatures from sticking when they're formed. This leaves a residue on the miniatures. Second, you never know when the guy who handled your miniature just got done eating a Whopper and fries, leaving big, greasy fingerprints on them. Either one will prevent the paint (including the primer) from sticking properly.
The process is normally:
1. Cleaning - removing mold lines and flash, cleaning up any mold defects, that sort of thing.
2. Washing - I normally just use dish detergent in hot water. I let them sit about five minutes then use a toothbrush (soft, set aside only for washing miniatures) to give them a quick scrub, followed by a thorough rinse.
3. Straightening - most miniatures don't require this. Plastic and PVC (like Bones) often do. If the piece is leaning oddly, the weapon is bent, a wing is droopy, a multi-piece miniature is warped and won't fit properly, or anything like that, it needs straightening. I fill a large bowl with ice water and a tray of ice cubes, then boil a pot of water next to it. I dip the miniatures in, count to 15, then make sure they're straight and carefully dip them into the ice bath until they're cold. It straightens them and (generally) keeps them that way.
4. Drying - make sure they're 100% dry. First, shake them really well (but don't fling them across the room

) I usually leave them all day or overnight, as water in crevices can take a long time to dry.
5. Priming
The process is enough that I generally try to do a dozen or more at a time. If I only need one or two, I'll abbreviate steps 2 and 3 if possible. For 2 I'll put the soap directly on the toothbrush as if it were toothpaste, scrub up a good foam on the miniature, and let that sit for a few minutes before brushing it again and rinsing. For 3, if it is only a small weapon or something that needs tweaked, I'll just turn the tap water on hot, hold it under, then turn the tap water on to cold. I've actually had some success on single larger pieces using a hair dryer. I've heard of people using heat guns, but I don't have one so I don't know. Just don't melt them.
Re: [Miniatures] Painting tips and progress reports (with pics!)
Posted: Tue Apr 30, 2019 10:23 am
by Blackhawk
hepcat wrote: ↑Tue Apr 30, 2019 8:36 am
Blackhawk wrote: ↑Tue Apr 30, 2019 2:18 am
Now I'm working on Sword & Sorcery, which has tons of pieces.
Are you going to leave the bases their original color for the enemy figs in order to distinguish between the different levels?
I've been going back and forth. I'd rather not, but I need to have another really good look at the figures. I've seen some shots online where people have picked out one feature on each set that all the miniatures have, then painted that in the correct color (the loincloth, or a wrist wrap.) If not, I'll likely paint the bases black then paint the edges the correct color. The characters and bosses will just have black bases.
What I don't want to do is try to protect the bases while priming dozens or these things or try to not smudge them while painting.
Re: [Miniatures] Painting tips and progress reports (with pics!)
Posted: Tue Apr 30, 2019 10:25 am
by Smoove_B
I was trying to come to grips with the same thing for the S&S miniatures. I don't care for the colored plastic but wasn't sure how to maintain identity. I hand't considered painting the edge a specific color, but that sounds like a good idea.
Re: [Miniatures] Painting tips and progress reports (with pics!)
Posted: Tue Apr 30, 2019 11:14 am
by YellowKing
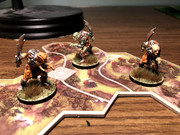
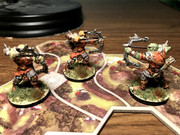
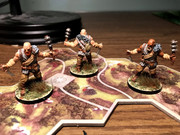
For my Sword & Sorcery figures, I just made the primary color of each blue, red, or green.
For example, I went pure fantasy and actually made blue skinned orcs, red skinned orcs, and green skinned orcs. Also painted their bases the corresponding primary color. They turned out pretty good.
Re: [Miniatures] Painting tips and progress reports (with pics!)
Posted: Tue Apr 30, 2019 11:52 am
by YellowKing
Re: [Miniatures] Painting tips and progress reports (with pics!)
Posted: Wed May 01, 2019 1:55 pm
by Daveman
Very nice! I took the plunge and put more effort into my bases as well. Finished the heroes, ruffians, goblins and Orc marauders so far.
Re: [Miniatures] Painting tips and progress reports (with pics!)
Posted: Wed May 01, 2019 4:55 pm
by YellowKing
Daveman wrote:Very nice! I took the plunge and put more effort into my bases as well.
Thanks. Yeah, I was going on the assumption that this is going to be a very supported, long-lived FF game like Mansions of Madness and Imperial Assault. No need to skimp on the minis if it's going to be one I probably play regularly for years.
I really need to get cracking on the heroes, but I couldn't resist starting a new campaign.
Re: [Miniatures] Painting tips and progress reports (with pics!)
Posted: Wed May 01, 2019 5:18 pm
by Smoove_B
I still have my copy in shrink and people here are finishing up the minis. What the hell is wrong with me?
Re: [Miniatures] Painting tips and progress reports (with pics!)
Posted: Thu May 02, 2019 11:54 pm
by AWS260
Painting miniatures is so... relaxing. I just spent the better part of the evening paint a cultist from Mansions of Madness. Possibly the most boring miniature imaginable, and the end result is not great, but it was exactly what my brain needed this evening.
Re: [Miniatures] Painting tips and progress reports (with pics!)
Posted: Fri May 03, 2019 12:46 am
by Blackhawk
I always listen to music, an audiobook, or a podcast while I paint. It keeps my hands and eyes busy and lets my mind wander. It's almost meditative.
Re: [Miniatures] Painting tips and progress reports (with pics!)
Posted: Fri May 03, 2019 12:58 am
by hentzau
I like putting on an old favorite movie in the background. It causes me to look up and refocus my eyes every once in a while.
Re: [Miniatures] Painting tips and progress reports (with pics!)
Posted: Sun May 12, 2019 6:01 pm
by AWS260
Cthonian from Mansions of Madness, Necromancer from Darkest Night, and Preston Fairmount from Mansions of Madness.

I'm going to try to drybrush some more green onto the Necromancer. Green seems like the color of evil in that game.
Re: [Miniatures] Painting tips and progress reports (with pics!)
Posted: Sun May 12, 2019 8:58 pm
by hepcat
Very nice.
Re: [Miniatures] Painting tips and progress reports (with pics!)
Posted: Fri May 17, 2019 8:58 am
by Daveman
Re: [Miniatures] Painting tips and progress reports (with pics!)
Posted: Fri May 17, 2019 10:16 am
by hentzau
Those are great!
Re: [Miniatures] Painting tips and progress reports (with pics!)
Posted: Fri May 17, 2019 10:50 am
by wonderpug
Looks fantastic! What kind of light box are you using for your mini pics?
Re: [Miniatures] Painting tips and progress reports (with pics!)
Posted: Fri May 17, 2019 10:52 am
by YellowKing
Very nice Daveman. I've got to finish up the wights and 4 of the heroes. I lost some motivation to paint after finishing the campaign, but I'm eager to start a new campaign so I need to get cracking.
Re: [Miniatures] Painting tips and progress reports (with pics!)
Posted: Fri May 17, 2019 11:10 am
by Smoove_B
Yeah, those are great - love the little details. Now that you've clearly perfected the process, can I send you mine to paint?
Re: [Miniatures] Painting tips and progress reports (with pics!)
Posted: Fri May 17, 2019 11:58 am
by Daveman
Thanks for all the comments guys, much appreciated. Not sure what about this struck me but I just really enjoyed working on this game. I'm still such an amateur though. Not counting my fancy bases I still don't drybrush, don't bother with eyes or facial details unless they're really prominent, etc.
wonderpug wrote: ↑Fri May 17, 2019 10:50 am
Looks fantastic! What kind of light box are you using for your mini pics?
Heh, all it is is a piece of paper gently propped up against a napkin holder (no crease, just a gentle roll) with my ott lite aiming down. Photos taken on my fancy iPhone 5c

Smoove_B wrote: ↑Fri May 17, 2019 11:10 am
Yeah, those are great - love the little details. Now that you've clearly perfected the process, can I send you mine to paint?
Ugh, no time. I've got 3 remaining teams for Blitz Bowl on my plate next.
Re: [Miniatures] Painting tips and progress reports (with pics!)
Posted: Fri May 17, 2019 12:23 pm
by Punisher
I like them all, but the green skeleton seems off to me for some reason. Did you shade the green parts at all? That might be whats bugging me.
Re: [Miniatures] Painting tips and progress reports (with pics!)
Posted: Fri May 17, 2019 12:26 pm
by wonderpug
Daveman wrote: ↑Fri May 17, 2019 11:58 amwonderpug wrote: ↑Fri May 17, 2019 10:50 am
Looks fantastic! What kind of light box are you using for your mini pics?
Heh, all it is is a piece of paper gently propped up against a napkin holder (no crease, just a gentle roll) with my ott lite aiming down. Photos taken on my fancy iPhone 5c
See, it's this kinda crap that makes photography so intimidating to buy into. Someday I hope I can save up for a nice paper & napkin holder rig.